Deploying a Model Prediction Server
Ethan Swan • PyCon 2023 • Slides: eswan18.github.io/sklearn-api-deploy-slides
Welcome!
Today's goal
Take a pre-trained model and deploy it within a FastAPI app.
- Using a scikit-learn
LogisticRegressionmodel - Predicting the species of an iris flower.
First: say hi to your neighbors!
Introduce yourself, your job, where you're from.
Hopefully you can find a buddy to chat with as we work through challenges together!
About me
Day job
- Backend Engineer on the Analysis Team at ReviewTrackers
- Previously: Data Scientist at 84.51˚ (5 years)
Outside teaching and consulting
- Teaching Python for 6+ years
- Adjunct at University of Cincinnati
- I offer consulting and corporate training services
- Web development & ML engineering
Find me online
- Website: ethanswan.com
- GitHub: eswan18
- Twitter: @eswan18
Agenda
- Setting up your project workspace
- A "hello world" FastAPI app
- Pydantic models and payloads
- Connecting a model to an API
About this tutorial
We'll move quickly through some lecture for each section, and then you'll work through a "to-do list" on your own to replicate what we saw in the lecture.
You can find lectures on the internet. The benefit of in-person tutorials is that I can come around and help you as you work.
Resources
Slides
eswan18.github.io/sklearn-api-deploy-slides
Application Code
github.com/eswan18/sklearn-api-deploy
Incremental Diffs
Section 1: eswan18.github.io/sklearn-api-deploy-slides/diffs/1.html
Section 2: eswan18.github.io/sklearn-api-deploy-slides/diffs/2.html
Section 3: eswan18.github.io/sklearn-api-deploy-slides/diffs/3.html
Section 4: eswan18.github.io/sklearn-api-deploy-slides/diffs/4.html
Setting up your project workspace
Goals
- Create a virtual environment with the packages we need
- Set up folder structure for we'll use for rest of tutorial
Getting started
Before we get started...
- Choose a folder where you're going to save your work during this tutorial
- Make sure you can access it from your IDE and terminal (Bash, PowerShell, etc.)
Project layout
- Keeping a regular project structure makes it easier to find things
- If something is broken, you know where to look
- What sorts of things do we need to keep track of?
- Code
- Models
- Tests
- Metadata (dependencies, etc.)
Project layout
- Make folders for application code (
app), models (app/models), and tests (tests) - Create empty
__init__.pyfiles inapp/andapp/models/- This tells Python that these are packages and makes it easier to import them.
project
├── app
│   ├── __init__.py
│   └── models
│       └── __init__.py
└── tests
Then we'll download the sklearn model file and store it in app/models.
iris_regression.pickle-> https://github.com/eswan18/sklearn-api-deploy/blob/main/app-section-1/app/models/iris_regression.pickle
project
├── README.md
├── app
│   ├── __init__.py
│   └── models
│       ├── __init__.py
│       └── iris_regression.pickle
└── tests
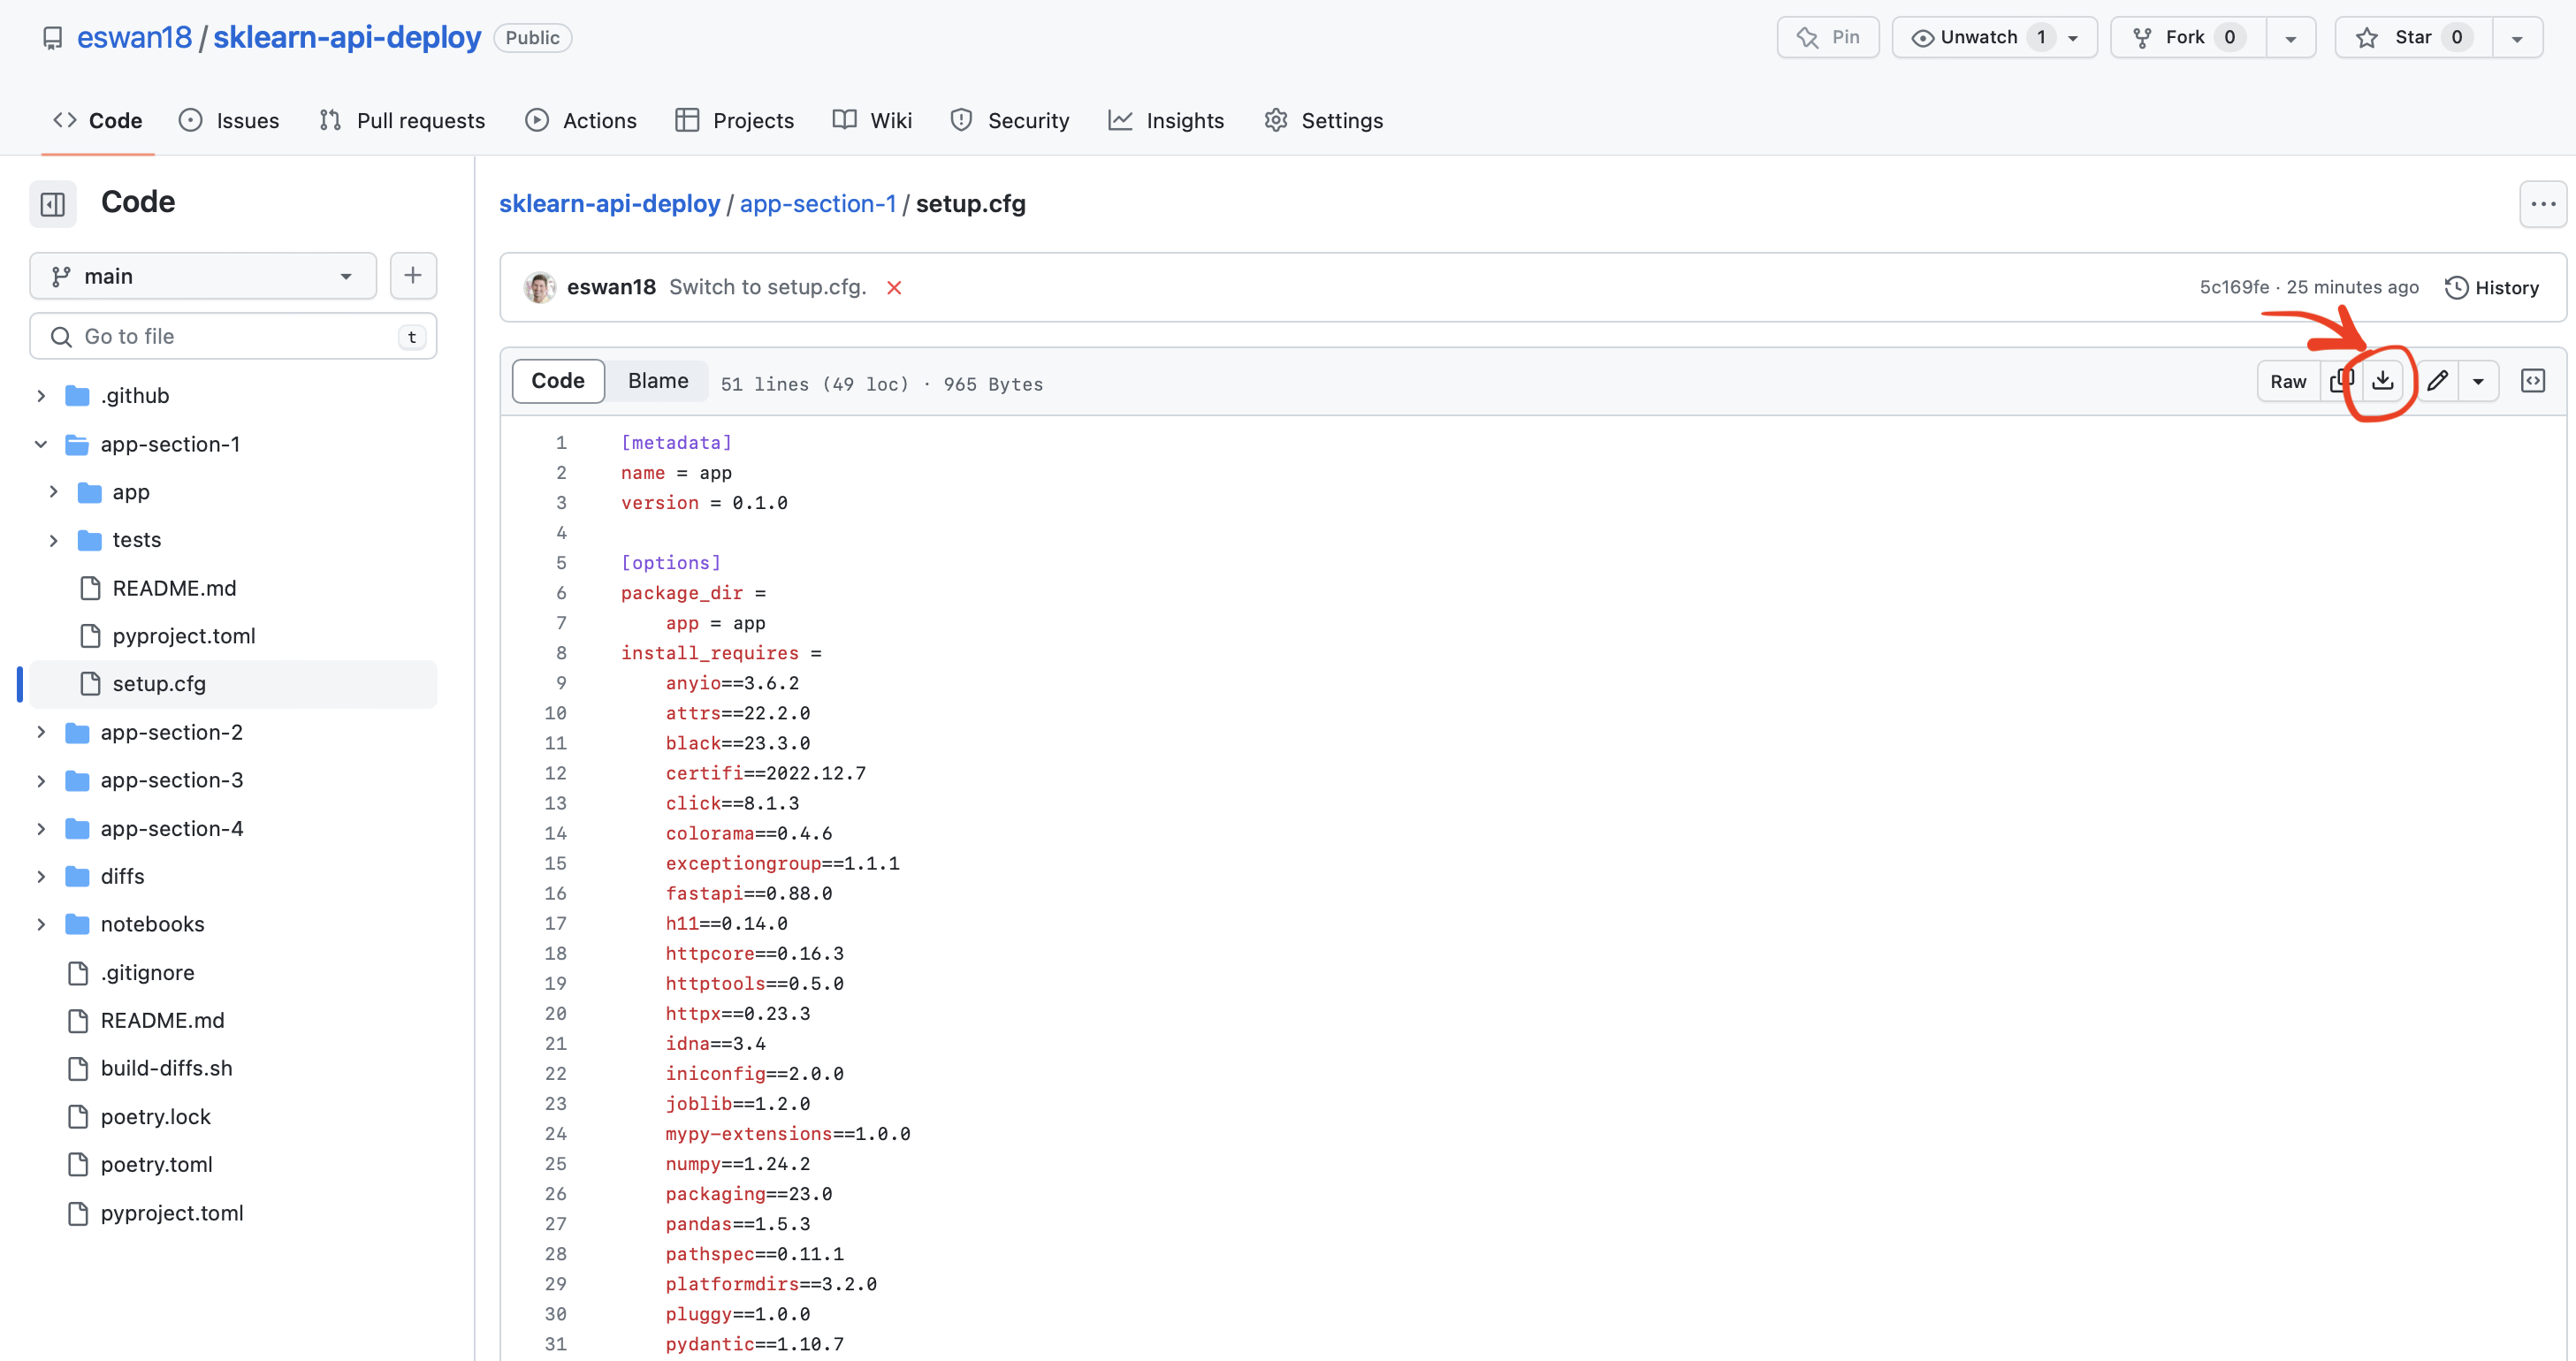
We want to keep track of our project's dependencies and metadata, which we can do with two files in the base of the project:
setup.cfg-> https://github.com/eswan18/sklearn-api-deploy/blob/main/app-section-1/setup.cfgpyproject.toml-> https://github.com/eswan18/sklearn-api-deploy/blob/main/app-section-1/pyproject.toml
project
├── app
│   ├── __init__.py
│   └── models
│       ├── __init__.py
│       └── iris_regression.pickle
├── pyproject.toml
├── setup.cfg
└── tests
setup.cfg
- A configuration file for a Python package
- Project name, dependencies, and optional additional metadata
# setup.cfg

[metadata]
name = app  # What name will we import our package under?
version = 0.1.0

[options]
package_dir =  # Where is the source code for the "app" package?
    app = app
install_requires =  # What dependencies do we need?
    anyio==3.6.2
    attrs==22.2.0
    ... # omitted

[options.package_data]
app = models/*  # Include non-Python files in app/models.
pyproject.toml
- Configuration for the "build tools" that set up Python packages
- We don't need much in here
- Just say that
setuptoolsis the tool that should build our package
- Just say that
# pyproject.toml

[build-system]
requires = ["setuptools"]
Readmes
- Always include a short "readme" file with your projects
- Explain the purpose of the project and how to install/run it
project
├── README.md
├── app
│   ├── __init__.py
│   └── models
│       ├── __init__.py
│       └── iris_regression.pickle
├── pyproject.toml
├── setup.cfg
└── tests
Readmes
Readmes are usually written in Markdown
- Markdown is simple and will just show what you type, but certain symbols (
*,#) have special meaning - Use file extension
.md
- Markdown is simple and will just show what you type, but certain symbols (
You can write your own or use mine:
Iris Prediction API
This repo contains an Iris prediction server. To start the application, run:
uvicorn app.main:app --host 0.0.0.0 --port 8000
Fetching Predictions
If the API server is running at http://localhost:8000, then the following should work in a local Python session:
>>> import requests
>>> response = requests.post(
...     "http://localhost:8000/predict",
...     json={
...         "sepal_width": 1,
...         "sepal_length": 1,
...         "petal_length": 1,
...         "petal_width": 1,
...     },
... )
>>> response.status_code
200
>>> response.json()
{'flower_type': 0}
Virtual environments
- Different projects we work on will typically require different libraries
- A "virtual environment" is a way to keep a project-specific set of dependencies
Creating virtual environments
- Navigate to the base of your project folder in the terminal
cd ~/path/to/project(I can help with this)
- Create a fresh virtual environment with
python3 -m venv venv - "Activate" this environment
source venv/bin/activate(Bash -- Mac/Linux).\venv\Scripts\activate(Powershell -- Windows)
- Install our project in editable mode
pip install -e .
Trying it out
You can make sure it worked by starting up Python and trying to import FastAPI
(venv) $ python
>>> import fastapi
If that runs without error, we're good to go!
To exit that interactive Python session:
>>> exit()
❗ To-Do List ❗
- Create folders:
app,app/models,tests - Create empty files:
app/__init__.pyandapp/models/__init__.py - Download & save model file in
app/modelsfolder - Download & save
setup.cfgandpyproject.tomlfiles in base of project folder - Write a
README.mdfile in base of project folder - Create a virtual environment and install requirements
python3 -m venv venv- either:
source venv/bin/activateon Mac/Linux.\venv\Scripts\activateon Windows
pip install -e .
Change summary: eswan18.github.io/sklearn-api-deploy-slides/diffs/1.html
A "hello world" FastAPI app
Goals
- Build a FastAPI app that returns
"the API is running"atlocalhost:8000/
Web APIs
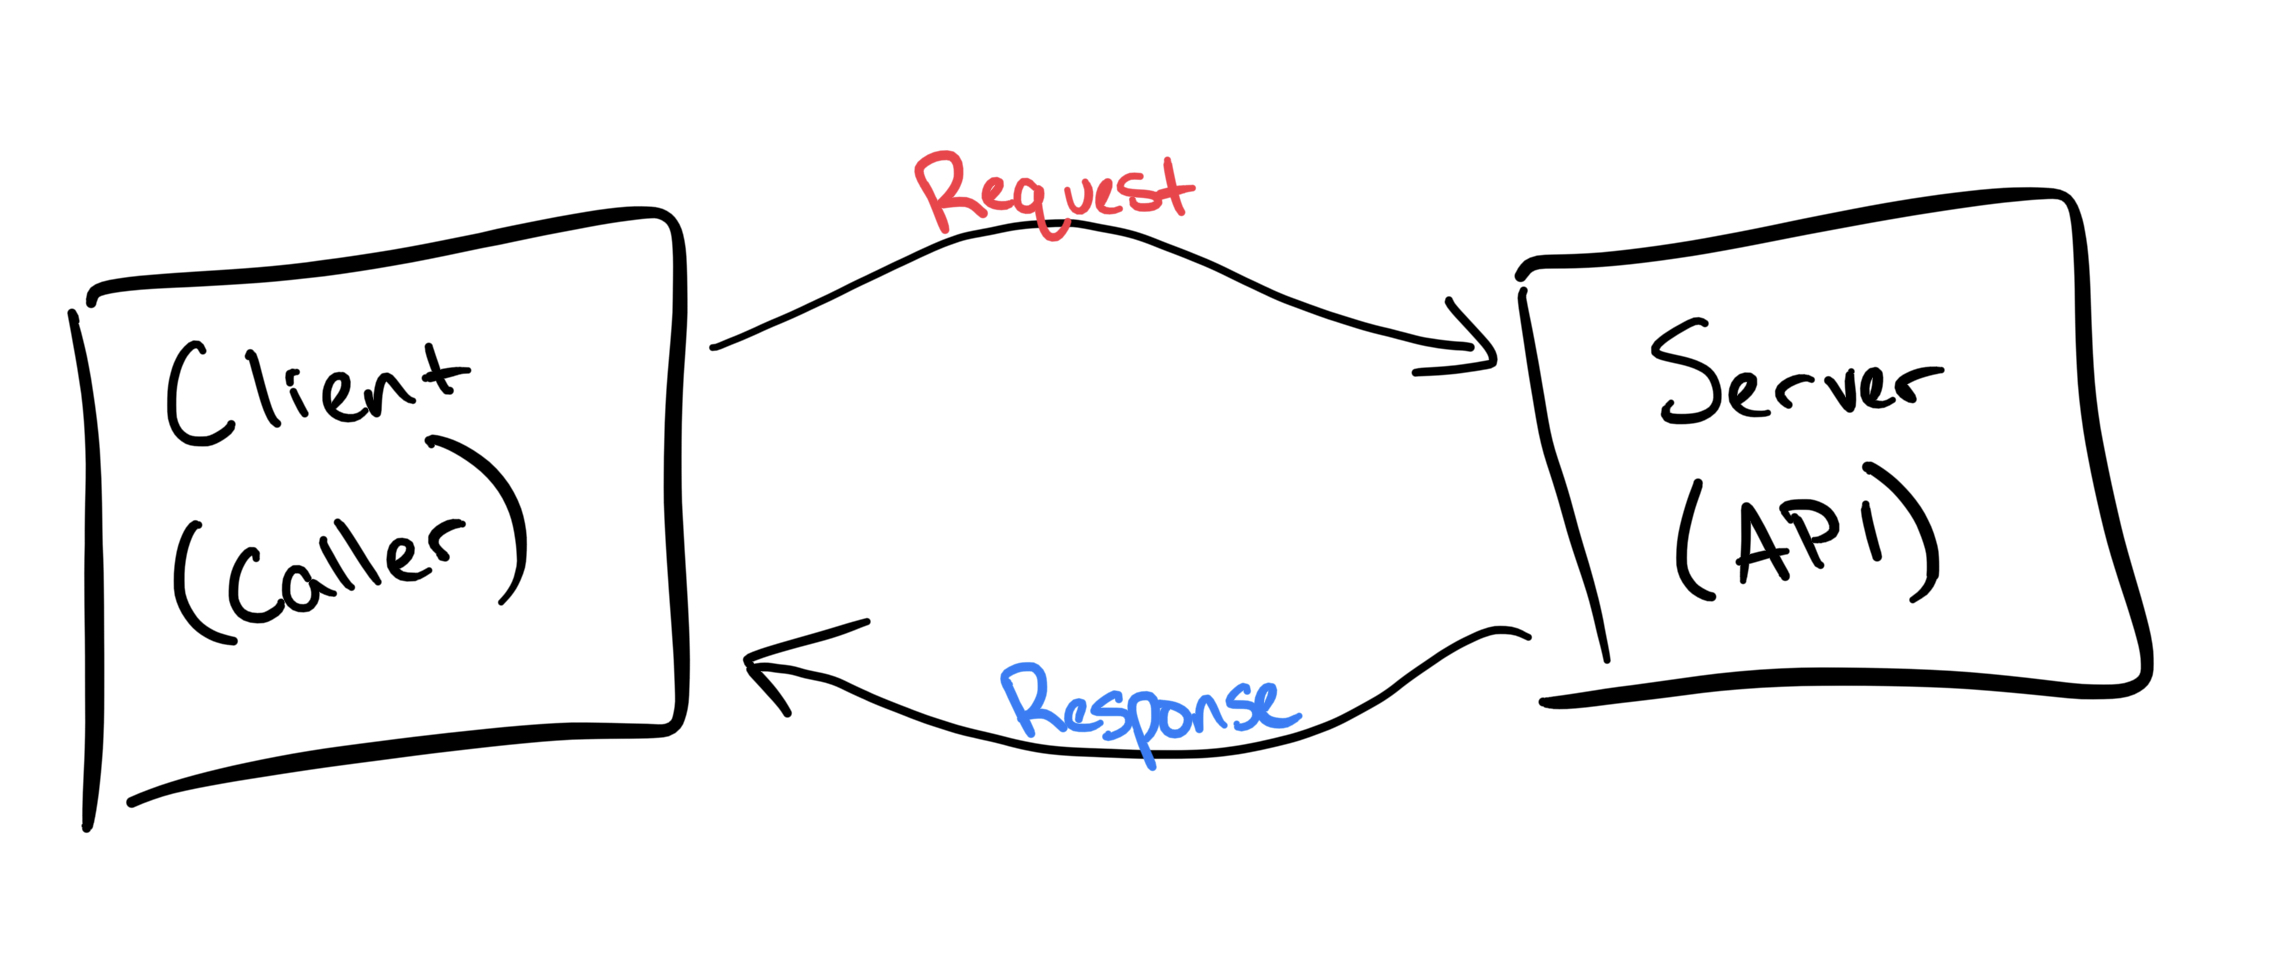
A Web API is a bit like a function that you can call over the internet
You send a request and get back a response
- A request is like function arguments
- A response is like a function return value
Requests specify a method -- a special argument for what type of action to take
GET-> fetch some dataPOST-> submit some data- ... some others we won't use today
Web API complications
Network issues
- Can result in slow (or no) response
Status codes
- Success vs error indicated by a 3-digit code in the response
- Codes 200-299 = success
- Codes 400-599 (eg 404) = error
Routes
- APIs are called by URL, not function name
- e.g.
https://myweatherapi.com/chicago/tempmyweatherapi.comis the "domain name"/chicago/tempis the "route" or "path"
FastAPI
A popular Python framework for building APIs
Simple
- Represents each route as a Python function
- Uses type hints to figure out what the request should look like.
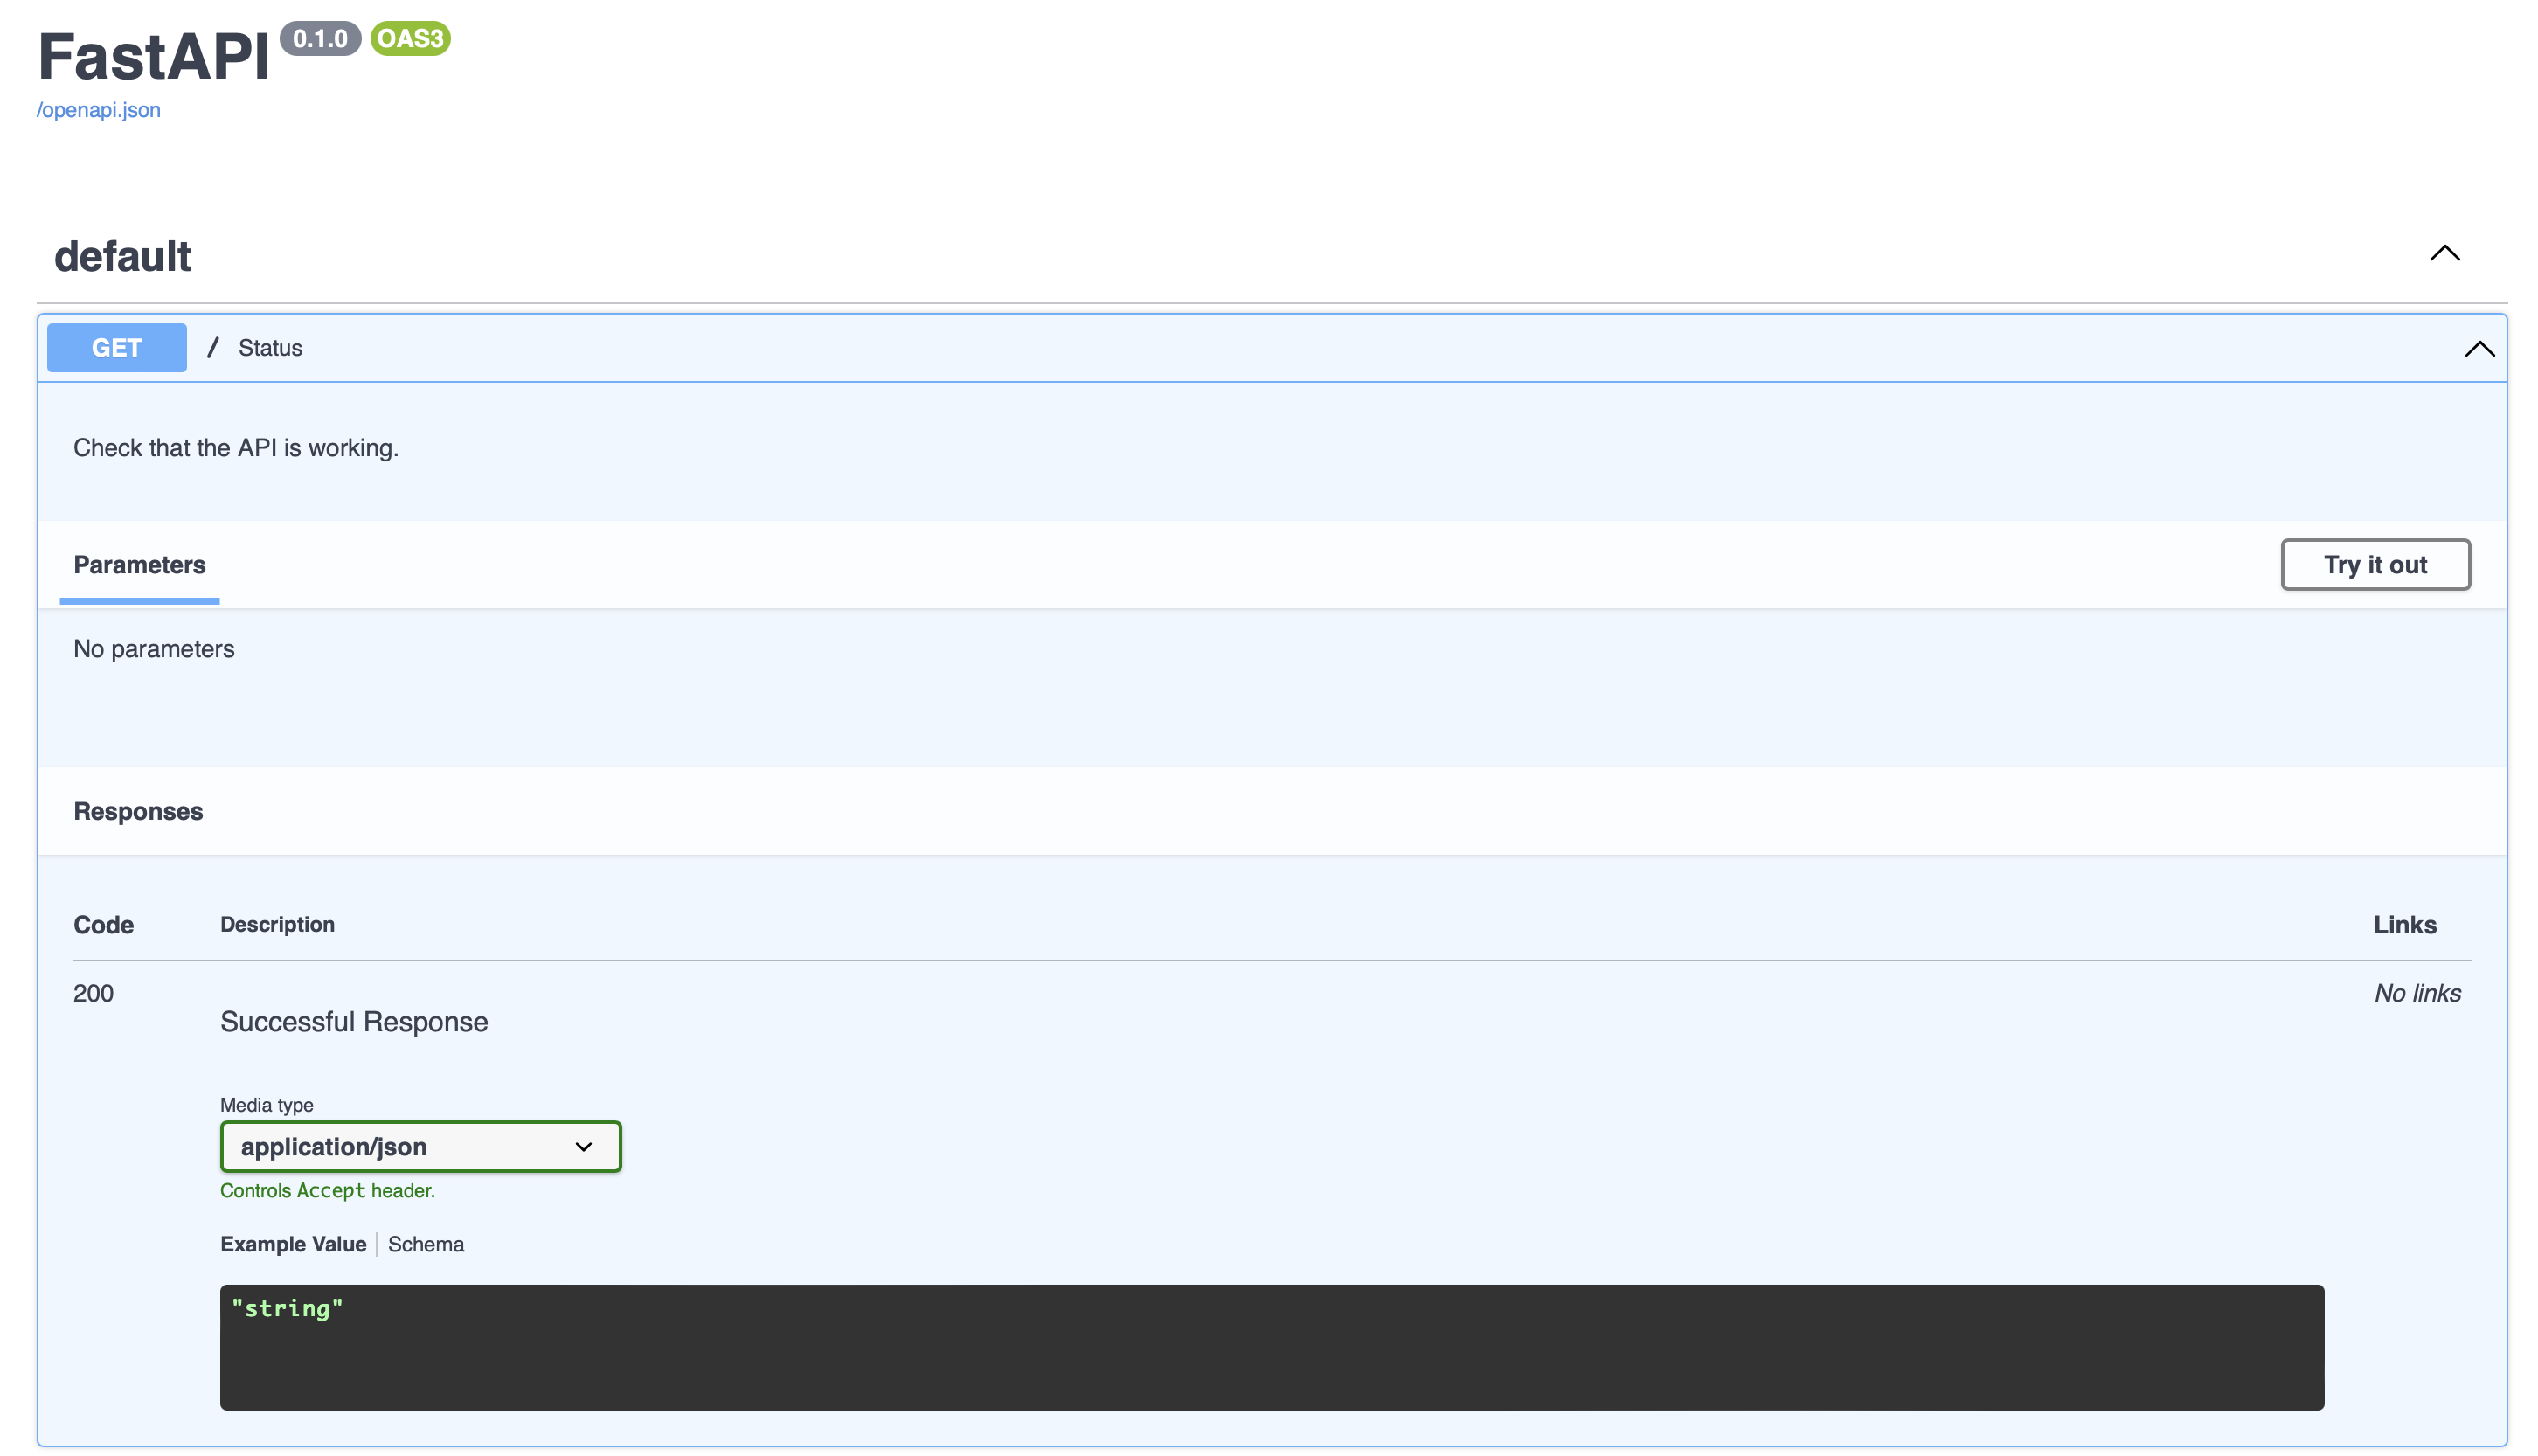
Easy Documentation
- Automatically generates docs using OpenAPI (aka Swagger) standard
Great Performance
- Handles requests asynchronously without any extra work
A simple FastAPI app
# app/main.py

from fastapi import FastAPI

app = FastAPI()

@app.get("/")  # Listen for GET method requests at "/" route
def status():
    """Check that the API is working."""
    return "the API is up and running!"  # Return this as response
Running the app
$ uvicorn app.main:app --host 0.0.0.0 --port 8000
INFO:     Started server process [36347]
INFO:     Waiting for application startup.
INFO:     Application startup complete.
INFO:     Uvicorn running on http://0.0.0.0:8000 (Press CTRL+C to quit)
Let's look at http://localhost:8000/ and http://localhost:8000/docs.
We can also send requests to the API via curl, a command line utility:
$ curl -X GET http://localhost:8000
"the API is up and running!"
Or even with Python and the httpx library:
>>> import httpx
>>> response = httpx.get("http://localhost:8000")

>>> response
<Response [200 OK]>

>>> response.json()
'the API is up and running!'
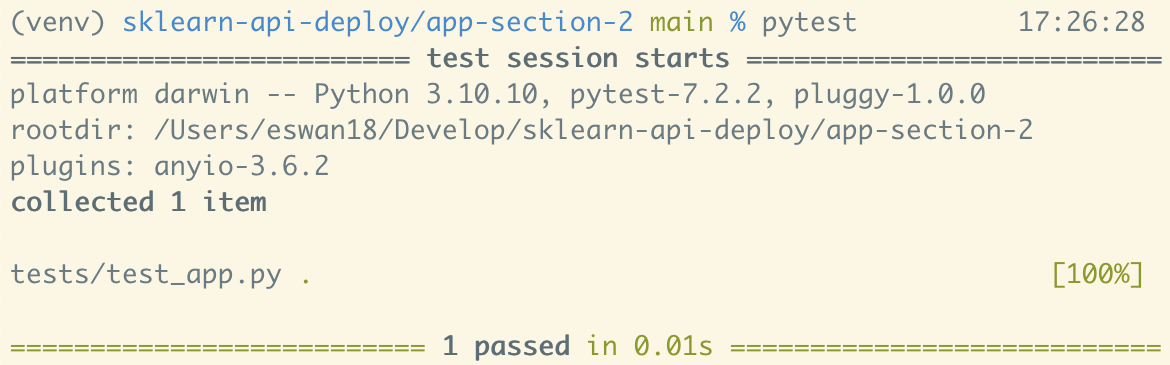
Testing our app
Interactive testing is good at first, but automated tests are a better solution
- You don't have to manually test your whole app after every change
We're going to use the very popular
pytestlibrary for testing- Most popular third-party testing library in Python
- Easy to get started with
Pytest
- Keep your test files in the
tests/directory - Files should be named
tests/test_<thing>.py - Tests themselves are just functions with
assertstatements
# tests/test_addition.py

def test_addition_of_2_and_2():
    result = 2 + 2
    assert result == 4
Pytest Fixtures
- Pytest lets you write setup code to use across multiple tests through fixture functions
- These are generally kept in
tests/conftest.py
Pytest Fixtures
In our case, we want to create an instance of our app to use in our tests:
# tests/conftest.py

import pytest
from fastapi.testclient import TestClient

from app.main import app


@pytest.fixture
def client() -> TestClient:
    return TestClient(app)
Testing our status endpoint
Then we can use it in a test that checks the status endpoint:
# tests/test_app.py

from fastapi.testclient import TestClient


def test_status_endpoint(client: TestClient):
    response = client.get("/")
    # 200 is the standard code for "success"
    assert response.status_code == 200

    # response.json() turns the response into Python objects
    payload = response.json()
    assert payload == "the API is up and running!"
❗ To-Do List ❗
- Build a
GETendpoint for/- At
app/main.py - It should return
"the API is running"when pinged
- At
- Test the endpoint interactively
uvicorn app.main:apphttp://localhost:8000/in the browser
- Write a test fixture for a
TestClient- At
tests/conftest.py
- At
- Write a test for the
/endpoint- At
tests/test_app.py
- At
- Run tests
pytest
Change Summary: eswan18.github.io/sklearn-api-deploy-slides/diffs/2.html
Pydantic models and payloads
Goals
- Build Pydantic models to represent observations and prediction values for our model
- Create a
/predictendpoint that accepts an observation and returns a (dummy) prediction
An endpoint with inputs
Right now, our status endpoint doesn't accept any inputs
@app.get("/")  # Listen for GET method requests at "/" route
def status():
    """Check that the API is working."""
    return "the API is up and running!"  # Return this as response
An endpoint with inputs
We need to take inputs if we want to return a prediction, e.g.
def predict(observation):
    """Return a prediction for the given observation."""
    prediction = mymodel.predict(observation)
    return prediction
Pydantic models
Pydantic is a library for defining data models
- It provides automatic validation that the data is the right type
- It also automatically converts to/from JSON, a common interchange format for the web
Observation model
We can use Pydantic to define a model of the data in an "observation":
from pydantic import BaseModel

class Observation(BaseModel):
    sepal_length: float
    sepal_width: float
    petal_length: float
    petal_width: float
Pydantic and type annotations
Annotating the types of the fields allows Pydantic to validate the data.
from pydantic import BaseModel

class Observation(BaseModel):
    sepal_length: float
    sepal_width: float
    petal_length: float
    petal_width: float
>>> obs = Observation(sepal_length=1.4, sepal_width=2, petal_length=3.3, petal_width=4)

>>> obs

Observation(sepal_length=1.4, sepal_width=2.0, petal_length=3.3, petal_width=4.0)
>>> obs = Observation(sepal_length=1.4, sepal_width=2, petal_length=3.3, petal_width="abc")

ValidationError: 1 validation error for Observation
petal_width
  value is not a valid float (type=type_error.float)
Valid Pydantic types
We only used float here, but Pydantic supports most common Python types...
int,float,str,bool
...as well as abstract types like...
Literal,Union[X, Y],Optional[X]
Prediction model
We can use the Literal type to specify that a prediction must be one of a few specific strings:
from typing import Literal

class Prediction(BaseModel):
    flower_type: Literal["setosa", "versicolor", "virginica"]
Let's save both models, along with docstrings.
# app/pydantic_models.py

from typing import Literal
from pydantic import BaseModel

class Observation(BaseModel):
    """An observation of a flower's measurements."""
    sepal_length: float
    sepal_width: float
    petal_length: float
    petal_width: float

class Prediction(BaseModel):
    """A prediction of the species of a flower."""
    flower_type: Literal["setosa", "versicolor", "virginica"]
A predict endpoint
Now that we have models for observations and predictions, we can build a (fake) /predict endpoint...
# app/main.py

from .pydantic_models import Observation, Prediction

@app.post("/predict", status_code=201)
def predict(obs: Observation) -> Prediction:
    """For now, just return a dummy prediction."""
    return Prediction(flower_type="setosa")
Using POST instead of GET
POSTis often used for "creating" something, and here we're creating a prediction
Specifying a 201 status code to be returned
200is the default for FastAPI, and just means "OK"201means "Created", which is more appropriate for aPOSTrequest
Using Python type hints to tell FastAPI what Pydantic models to use
Updating our tests
We need to update our tests to exercise the new /predict endpoint.
# tests/test_app.py

def test_predict(client: TestClient):
    response = client.post(
        "/predict",
        # We pass observation data as a dictionary.
        json={
            "sepal_length": 5.1,
            "sepal_width": 3.5,
            "petal_length": 1.4,
            "petal_width": 0.2,
        },
    )
    assert response.status_code == 201
    payload = response.json()
    # For now, our fake endpoint always predicts "setosa".
    assert payload["flower_type"] == "setosa"
❗ To-Do List ❗
- Add
ObservationPydantic model- Fields:
sepal_length,sepal_width,petal_length,petal_width
- Fields:
- Add
PredictionPydantic model- Fields:
flower_type
- Fields:
- Write a "fake" POST
/predictendpoint- Test it interactively:
http://localhost:8000/docs
- Test it interactively:
- Write a test for it
- At
tests/test_app.py
- At
Change Summary: eswan18.github.io/sklearn-api-deploy-slides/diffs/3.html
Connecting our model to the API
Goals
- Update the implementation of the
/predictendpoint to use our sklearn model
Loading our model
- Our model is stored in a file at
app/models/iris_regression.pickle - We'll use
importlib.resources.open_binaryto open it, and decode it withpickle- Allows us to reference a file relative to our installed package
- Avoids quirks of importing relative to where you run the code from
# app/main.py
...

import importlib
import pickle
from sklearn.linear_model import LogisticRegression

def load_model(model_name: str) -> LogisticRegression:
    with importlib.resources.open_binary("app.models", model_name) as f:
        model = pickle.load(f)
    return model

@app.get("/")
def status():
    """Check that the API is working."""
    return "the API is up and running!"
Loading our model
- We'll save the model name in a constant..
- So we can update it in future, e.g.
iris_regression_v2.pickle
- So we can update it in future, e.g.
- ...and load it before our endpoint code:
# app/main.py
...

import importlib
import pickle
from sklearn.linear_model import LogisticRegression

def load_model(model_name: str) -> LogisticRegression:
    with importlib.resources.open_binary("app.models", model_name) as f:
        model = pickle.load(f)
    return model

MODEL_NAME = "iris_regression.pickle"
model = load_model(MODEL_NAME)
app = FastAPI()

@app.get("/")
def status():
    """Check that the API is working."""
    return "the API is up and running!"
Loading in global scope
We could run load_model() within the endpoint where it's used -- why not?
- Loading models can be slow, and that would add latency to our predictions
- Some models are large, like neural nets
- Running
load_model()outside any endpoint loads the model just a single time for our whole application
Predictions
Before writing a predict endpoint, let's look at how to make predictions with a model.
>>> model = load_model("iris_regression.pickle")
>>> model
LogisticRegression(max_iter=1000)
>>> import pandas as pd
>>> observation = pd.Series({
...     "sepal length (cm)": 1,
...     "sepal width (cm)": 2,
...     "petal length (cm)": 3,
...     "petal width (cm)": 4,
... })
>>> observation
sepal length (cm)    1
sepal width (cm)     2
petal length (cm)    3
petal width (cm)     4
dtype: int64
Predicting on a single observation gives an error
>>> observation
sepal length (cm)    1
sepal width (cm)     2
petal length (cm)    3
petal width (cm)     4
dtype: int64
>>> model.predict(observation)
/Users/eswan18/Develop/sklearn-api-deploy/.venv/lib/python3.10/site-packages/sklearn/base.py:439: UserWarning: X does not have valid feature names, but LogisticRegression was fitted with feature names
  warnings.warn(
Traceback (most recent call last):
  <...omitted...>
  ValueError: Expected 2D array, got 1D array instead:
array=[1 2 3 4].
Reshape your data either using array.reshape(-1, 1) if your data has a single feature or array.reshape(1, -1) if it contains a single sample.
The model expects a 2-dimensional array or a DataFrame but we gave a Series (1-dimensional)
Luckily, we can easily turn an observation into a one-row DataFrame...
>>> obs_df = pd.DataFrame([observation])
>>> obs_df
   sepal length (cm)  sepal width (cm)  petal length (cm)  petal width (cm)
0                  1                 2                  3                 4
>>> predictions = model.predict(obs_df)
>>> predictions
array([2])
We get back an array with a prediction for every row -- although we only passed one.
>>> predictions
array([2])
>>> obs_prediction = predictions[0]
>>> obs_prediction
2
We'll need a mapping to convert the class number (here 2) back to a flower name.
>>> class_flower_mapping = {
...     0: 'setosa',
...     1: 'versicolor',
...     2: 'virginica',
... }
>>> predicted_flower = class_flower_mapping[obs_prediction]
>>> predicted_flower
'virginica'
Adding this to our /predict code.
We left last section with this "dummy" /predict endpoint.
@app.post("/predict", status_code=201)
def predict(obs: Observation) -> Prediction:
    """For now, just return a dummy prediction."""
    return Prediction(flower_type="setosa")
Now...
CLASS_FLOWER_MAPPING = {
    0: 'setosa',
    1: 'versicolor',
    2: 'virginica',
}

@app.post("/predict", status_code=201)
def predict(obs: Observation) -> Prediction:
    """For now, just return a dummy prediction."""
    # .predict() gives us an array, but it has only one element
    prediction = model.predict(obs.as_dataframe())[0]
    flower_type = CLASS_FLOWER_MAPPING[prediction]
    pred = Prediction(flower_type=flower_type)
    return pred
We're missing just one piece -- the implemention of Observation.as_dataframe().
Updating our Observation with .as_row() and as_dataframe():
import pandas as pd

class Observation(BaseModel):
    """An observation of a flower's measurements."""
    sepal_length: float
    sepal_width: float
    petal_length: float
    petal_width: float

    def as_dataframe(self) -> pd.DataFrame:
        """Convert this record to a DataFrame with one row."""
        return pd.DataFrame([self.as_row()])

    def as_row(self) -> pd.Series:
        row = pd.Series({
            "sepal length (cm)": self.sepal_length,
            "sepal width (cm)": self.sepal_width,
            "petal length (cm)": self.petal_length,
            "petal width (cm)": self.petal_width,
        })
        return row
Let's try it out!
$ curl -X POST localhost:8000/predict \
    -d '{"sepal_length": 1, "sepal_width": 2, "petal_length": 3, "petal_width": 4}' \
    -H "Content-Type: application/json"
{"flower_type":"virginica"}
Updating our test
Last thing: we need to update our test for /predict...
def test_predict(client: TestClient):
    # Test an obs that should come back as setosa
    response = client.post(
        "/predict",
        json={
            "sepal_length": 5.1,
            "sepal_width": 3.5,
            "petal_length": 1.4,
            "petal_width": 0.2,
        },
    )
    assert response.status_code == 201
    payload = response.json()
    assert payload["flower_type"] == "setosa"

    # Test an obs that should come back as versicolor
    response = client.post(
        "/predict",
        json={
            "sepal_length": 7.1,
            "sepal_width": 3.5,
            "petal_length": 3.0,
            "petal_width": 0.8,
        },
    )
    assert response.status_code == 201
    payload = response.json()
    assert payload["flower_type"] == "versicolor"
❗ To-Do List ❗
- Write
load_model()function- At
app/main.py
- At
- Add
Observation.as_row()method, returning apandas.Series - Add
Observation.as_dataframe()method, returning apandas.DataFrame - Implement
/predictendpoint with the real model- Test it interactively:
http://localhost:8000/docs
- Test it interactively:
- Update test for for POST
/predictendpoint- Add an observation:
[7.1, 3.5, 3.0, 0.8]->versicolor
- Add an observation:
Stretch goal: batch prediction
- Add a POST
/batch_predictendpointdef batch_predict(observations: List[Observation]) -> List[Prediction]:
- Add a test for it
Change Summary: eswan18.github.io/sklearn-api-deploy-slides/diffs/4.html
Questions
Other topics
Managing application and dependencies
Installing an application as a package is a very good idea
- Much better than just a
requirements.txt - Fixes all kinds of import trouble in source code and tests (esp. across different platforms)
A true dependency management tool is an improvement and that's what I do in my own projects.
- Handle the tracking & upgrading of direct and transitive dependencies.
I use Poetry which is pretty mature and supports most of my needs
- I still run into hiccups occasionally though
There's also Pipenv which is similar but I haven't used as much.
Other options:
Model storage formats
- We used pickle for simplicity
- Pickle has some compatibility concerns
- Not always portable across Python versions, package versions, and OSes/architectures
- However, not a lot of other common options in my experience
- Can save a matrix of weights if it's a neural net
- Some packages have their own serialization formats
- Scikit-learn docs have a section on Model Persistence
Alternatives to API-based deployment
- Batch prediction: run predictions on a schedule and save results to a database
- If model scoring is slow, this means predictions are ready when needed
- But your predictions can be out-of-date
- Streaming prediction: score data in small batches as it arrives
- Again, predictions are ready when needed (usually)
- But more complicated to set up than batch or API-based prediction
Thorough testing
- We only really wrote one test
- Ideally you'd have several tests for each endpoint
- Test the "happy path" with a few predictions
- Test error handling with bad inputs
- How to handle testing the model itself? Tricky question
- Often not so bad to test a few predictions, but this may change with new model versions
- An active field right now, I haven't seen clear consensus
Authentication
- A data scientist probably won't (and shouldn't) write authentication code
- However, it's good to be aware of the options
- Basic auth: just pass username and password
- API keys: issue a token to the user that they send back with their requests
- OAuth: a more complicated protocol for authentication
Deploying an API
- As a data scientist or ML engineer, unlikely you'll be doing this but maybe
- Typically, host it in the cloud:
- Simple: Heroku (PaaS)
- Medium: containerize (with Docker) and run app on AWS, GCP, Azure
- Hard: Kubernetes